In this post, I am going to talk about setting up Strapi, an open-source headless CMS on Oracle cloud VPS using nginx reverse proxy, linking to a domain name and setting up SSL.
Creating VPS Instance
Go to oracle cloud my account
Click on create instance button
Create instance with the following specs
ubuntu 20.04

new security list subnet

Shape: VM.Standard.A1.Flex

OCPU count: 1

Network bandwidth (Gbps): 1

Memory (GB): 6

Local disk: Block storage only 50 gb
Don’t forget to download and save SSH key file.
Open terminal
Go to downloads or to the folder where SSH key file is being saved -> cd Downloads
Check if there is SSH key file in Downloads folder -> ls
Secure the ssh key file -> chmod 400 ssh-key-file-name.key
Enter to vps via SSH -> ssh -i ssh-key-file-name.key [email protected]
Don’t forget to replace your VPS Ip address.
Installing Node and Maria-DB database
Update the system
sudo apt update
sudo apt upgrade
Install the node source
curl -fsSL https://deb.nodesource.com/setup_14.x | sudo -E bash -Install Node js
sudo apt install nodejs -yInstall mariadb-server
sudo apt install mariadb-server -yCreating new database, user and password in our database.
sudo mysql
create database strapi;
grant all privileges on strapi.* to 'strapi'@'localhost' identified by 'password';
flush privileges;
exit
Install strapi
yarn create strapi-app my-projectChoose custom setting and the followings.
? Choose your installation type Custom (manual settings)

? Choose your preferred language JavaScript

? Choose your default database client mysql

? Database name: strapi

? Host: 127.0.0.1

? Port: 3306

? Username: strapi

? Password: password

? Enable SSL connection: No
Build the webpack ->
cd my-project

yarn build / npm run build
Run the app ->
yarn develop / npm run developMessage about app running at http://localhost:1337/admin should occur.
Ctrl + C to stop the app for now.
Setup Nginx
Install nginx -> sudo apt install nginx
Write the nginx config -> sudo nano /etc/nginx/sites-available/strapi
server {
		listen 80;
        server_name strapi.testdomain.online;

        location / {
            proxy_set_header   X-Forwarded-For $remote_addr;
            proxy_set_header   Host $http_host;
            proxy_pass         "http://127.0.0.1:1337";
        }
}
Notes: we will setup the domain “strapi.testdomain.online” later.
Link sites-available with sites-enabled in Nginx ->
sudo ln -s /etc/nginx/sites-available/strapi /etc/nginx/sites-enabled/Check nginx syntax -> sudo nginx -t
Syntax OK status should appear here.
Restart nginx -> sudo systemctl restart nginx
Setup Opening Ports and Firewall
Install nmap to check ports status in our vps -> sudo apt install nmap
Check the port states with nmap -> sudo nmap -sS 111.133.55.112
Open port 80 for http requests -> sudo iptables -I INPUT -m state --state NEW -p tcp --dport 80 -j ACCEPT
Check the port states again -> sudo nmap -sS 111.133.55.112
The return message should include port 80 here.
Run the strapi app again -> npm run develop
Check if nginx running properly -> curl --head http://111.133.55.112
The following message should occur -> HTTP/1.1 200 OK Server: nginx/1.18.0 (Ubuntu)
Network settings
Go to Oracle cloud instance page
Click on Subnet then click on Security List
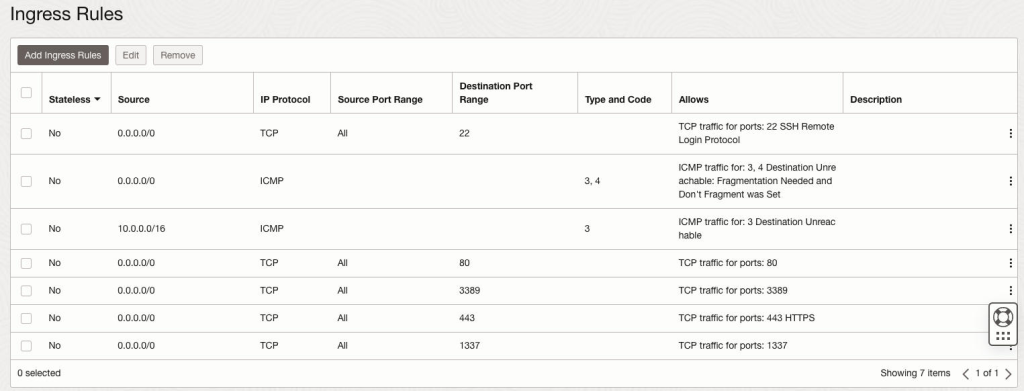
Click ‘Add Ingress Rules’ to add accessible ports
Add port 80 and 443 for TCP traffic for 0.0.0.0/0 Ip sources (means all ip sources)

Check if the app is accessible remotely -> open browser -> and go to http://111.133.55.112
The Strapi Admin panel should appear.
Setup Subdomain, SSL
Setup subdomain
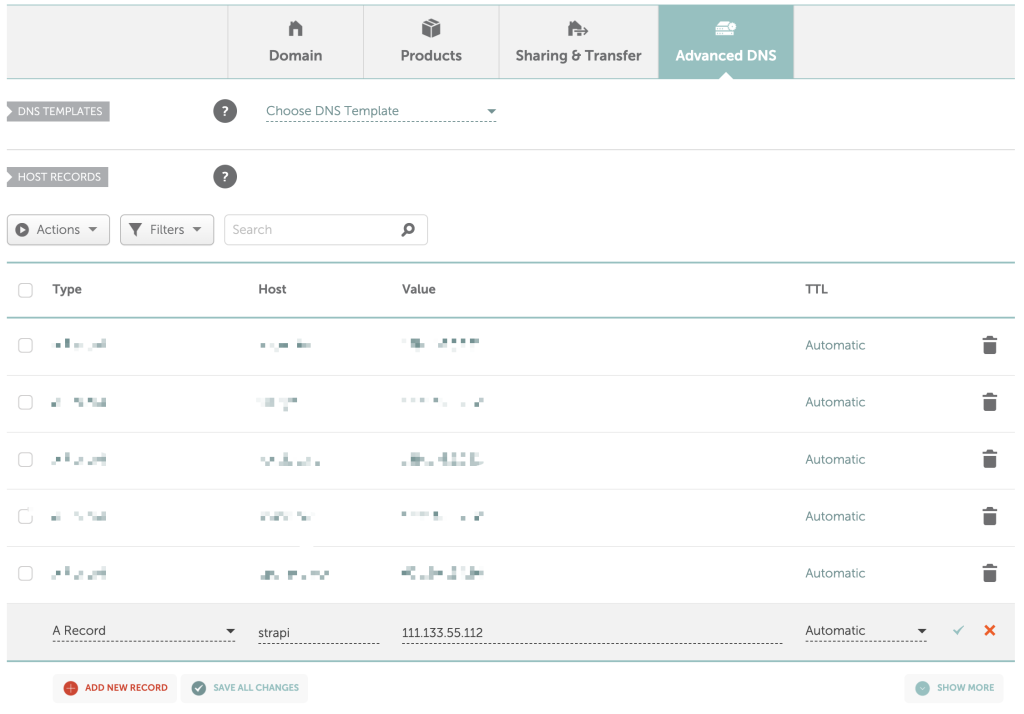
Go to Namecheap account page -> Add subdomain to one domain -> go to advanced DNS setting -> add A record DNS with subdomain name as host and ip address of vps.

Setup SSL for our strapi app
Certbot instructions (nginx, ubuntu20) > https://certbot.eff.org/instructions?ws=nginx&os=ubuntufocal
Update snap -> sudo snap install core; sudo snap refresh core
Install certbot -> sudo snap install --classic certbot
Setting up certbot for nginx -> sudo certbot --nginx
Insert email when being request
Choose the domain name ( certbot will automatically choose the domain main in nginx config, in our case, strapi.testdomain.online).
Setup renew setting -> sudo certbot renew --dry-run
Open 443 port for HTTPS access
sudo iptables -I INPUT -m state --state NEW -p tcp --dport 443 -j ACCEPT
Check if port 443 is running properly -> sudo nmap -sS 111.133.55.112
If port states include 443.
The setup is DONE.
Access the app
Go to https://strapi.testdomain.online/admin
If the page return properly, it’s done.
If the app stops running when the terminal is closed, it can be solved as follow.
Keep the app running even after you exit your SSH session
To keep the app running even after you exit your SSH session, you can use a terminal multiplexer like tmux or screen. These tools allow you to create multiple terminal sessions within a single window and detach from them, leaving them running in the background.
Here’s how you can use tmux to keep your app running:
On Ubuntu or Debian, you can install it using the command: -> sudo apt-get install tmux
Start a new tmux session by typing -> tmux new -s mysession
This will create a new tmux session with the name “mysession”.
Run your app within the tmux session as you normally would.
To detach from the tmux session, press Ctrl-b and then d. This will return you to the main terminal shell, but your app will continue to run in the tmux session in the background.
To reattach to the tmux session later and check on your app, SSH back into your VPS and type:
tmux attach -t mysessionThis will reattach you to the tmux session with the name “mysession”, where you can check on your app and interact with it as usual.
With tmux, you can also create multiple sessions, switch between them, and share them with other users. Check out the tmux documentation for more information on these advanced features.
List all the existing tmux sessions by running the following command:
tmux list-sessionsto delete or kill session
tmux kill-session -t mysessionNotes
- strapi needs to be rebuilt after installing plugins
- strapi needs to restart and run
npm run buildafter .env file changes


Leave a Reply